¶ Deleting Projects - Venio Console
¶ Precautions
-
Triple check that you have selected the correct project to delete before proceeding. Project deletion is permanent and cannot be undone.
-
Ensure you have a functional backup of the project folder and/or database before deleting in case the data needs to be restored.
-
If only deleting the database, be aware the project folder will still consume disk space and need to be manually deleted.
-
Monitor the deletion process closely and do not navigate away from the deletion window until completion to avoid errors.
-
Deletion times will vary based on project size and number of items. Larger projects may take hours to fully delete.
Taking precautions like comprehensive backups and carefully confirming selection is crucial to avoid accidental data loss when deleting projects. Let the full deletion complete before taking any other actions on the project.
¶ Alternative to Deletion
If instead of deleting a project, you simply want the project removed from the case launchpad so users cannot access it, have your SQL administrator follow this query to remove all the users from the project
¶ Guide
To delete a project in Venio Console, follow these steps:
¶ Open the project you wish to delete
Login to Venio console, and open your project from the case launchpad.
¶ Navigating to Case Deletion
On the Process tab, click the Delete Project button.
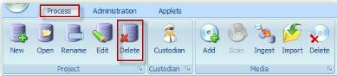
Click Delete Project to delete the project.
¶ Case Deletion Process
The Delete Project message box asking to confirm deletion will be displayed.
Click Yes to confirm.

An alert message to re-confirm deletion will be displayed.
Click OK to confirm again.

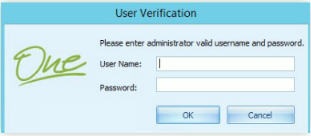
The User Verification screen will be displayed.
Enter your Venio Console username and password and click OK.
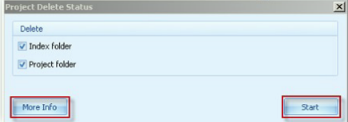
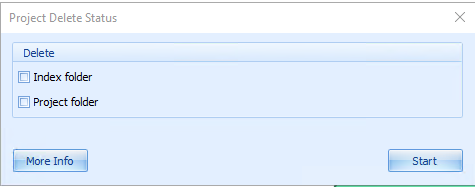
The Project Delete Status dialog will be displayed.
Select the available delete options such as Index folder and Project folder.
¶ Recommended Practices
Depending on the size of your case, you may wish to modify the options in the 'Project Delete Status' pop-up window.
¶ Recommendation for Small Cases
!NOTE! - If the case is small, or if the case is large but you are okay with waiting a long time for deletion to complete, select both options to delete the Index Folder as well as the Project Folder
¶ Recommendation for Large Cases
!NOTE! - If the case is large and you do not wish to wait a long time for deletion to complete, make sure both options to delete the Index Folder as well as the Project Folder are NOT selected! Be sure to manually delete the project folder later.
Click the Start button.
¶ Monitoring Deletion Progress
Click More Info to see the Project Delete Status dialog.
This will display the detailed status of the deletion.