¶ Single Sign-On (SSO) Documentation for Venio Systems
¶ Table of Contents
- Overview of SSO in Venio
- Configure Azure Entra ID as an Identity Provider (IdP)
- Configure Venio
- SSO Setup for The VenioConnector™ for Direct Exports to Relativity Server (SAML)
- SSO Setup for The VenioConnector™ for Direct Exports to RelativityOne (OAuth with OIDC)
- Troubleshooting and FAQs
- Annex A: Preparing Public and Private Keys
- Additional Resources
¶ 1. Overview of SSO in Venio
Single Sign-On (SSO) enables users to authenticate once and access multiple applications without needing to log in separately for each. Venio Systems supports SSO integration for Venio user access, as well as SSO for the VenioConnector™ for direct exports to Relativity Server and RelativityOne, providing seamless access and enhanced security.
- Venio: Uses Azure Entra ID configured with a public/private keypair for authentication.
- VenioConnector™ (Relativity Server): Uses SAML (Security Assertion Markup Language) with username and password authentication.
- VenioConnector™ (RelativityOne): Uses OAuth with OpenID Connect (OIDC), requiring a Client ID and Client Secret.
This guide offers detailed setup instructions for configuring SSO with Azure Entra ID as the IdP, as well as integrating Relativity Server and RelativityOne SSO for the VenioConnector™, and troubleshooting common issues.
¶ 2. Configure Azure Entra ID as an Identity Provider (IdP)
Azure Entra ID serves as the IdP for Venio Systems, managing user authentication and group assignments. Follow these steps to set up an enterprise application, configure SSO, and register an application in Azure Entra ID.
¶ 2.1 Create Enterprise Application
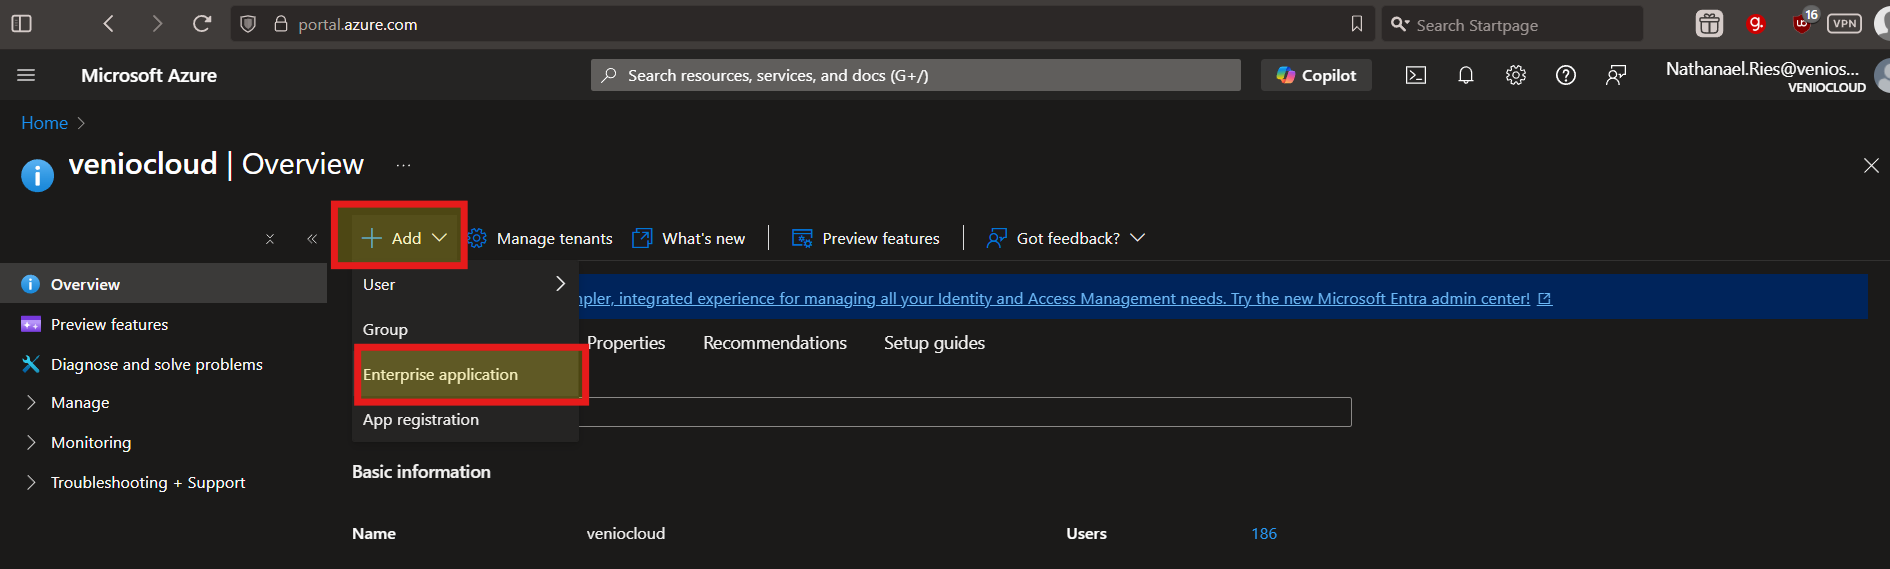
-
Sign into Azure Portal: Log in to portal.azure.com with your Azure account.
-
Navigate to Entra ID: Search for ENTRA from the search bar.
-
Select Microsoft Entra ID in the search results services section.

-
Access Enterprise Applications: Choose + Add then select Enterprise applications from the menu.
-
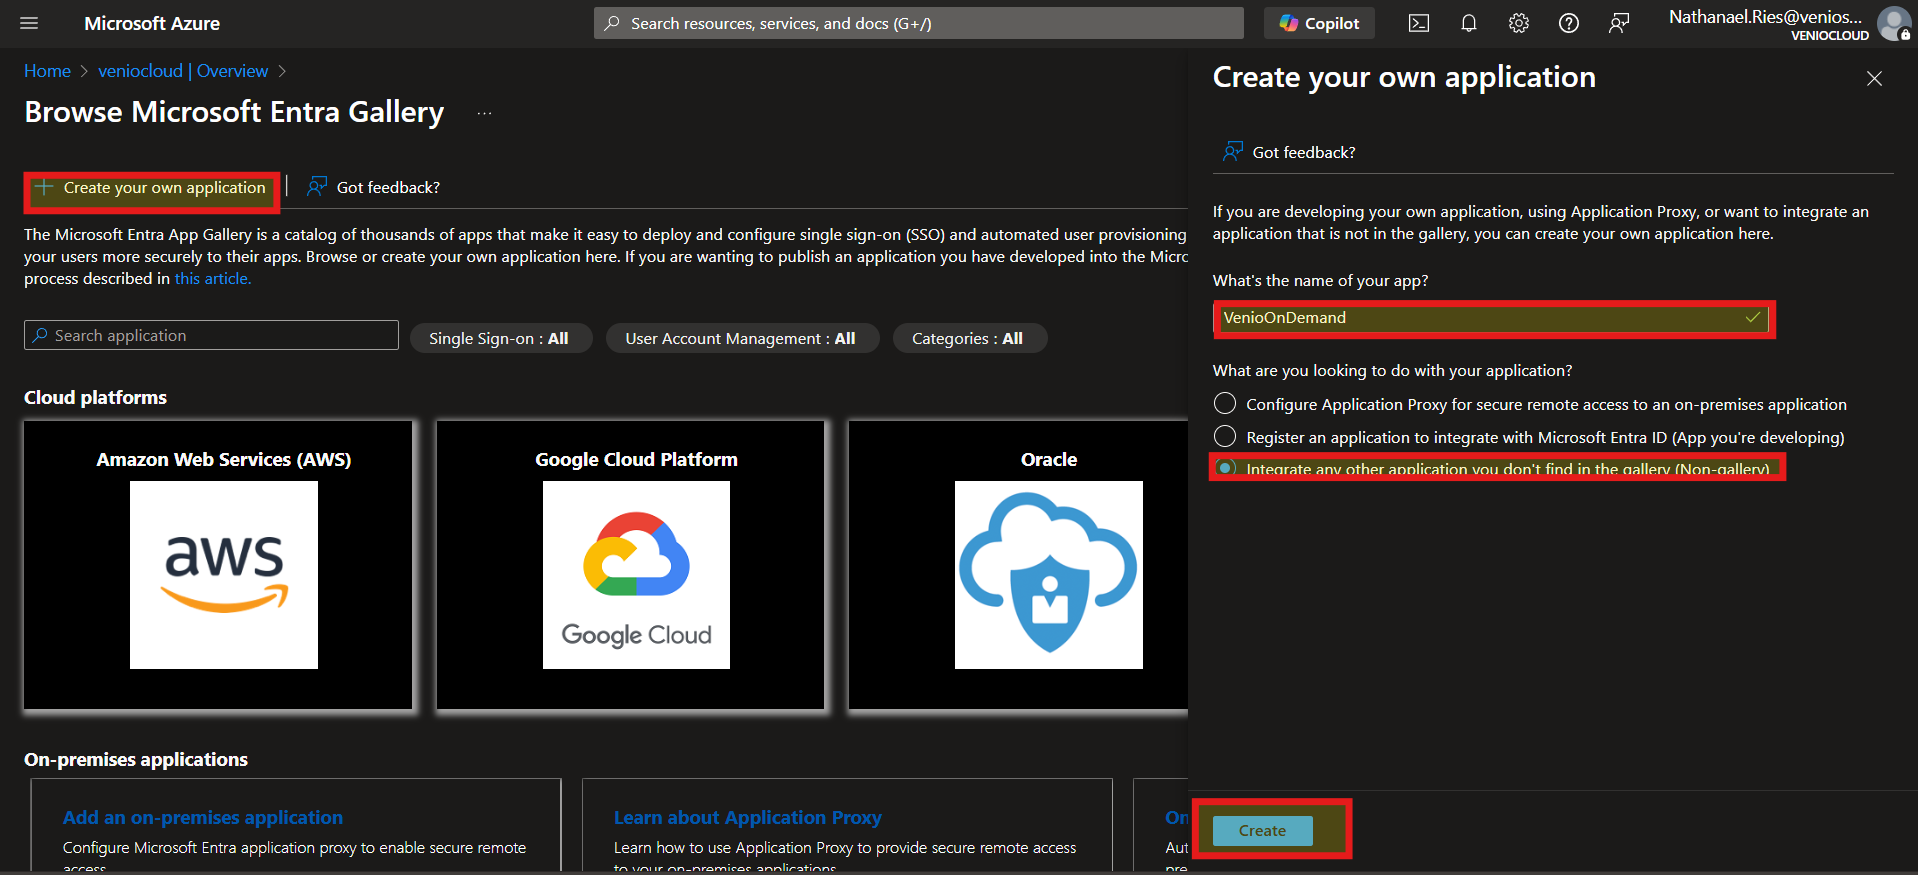
Create New Application: Click Create Your Own Application.
-
Name the Application: Enter a name (e.g., "Venio SSO") and select Integrate any other application you don’t find in the gallery (Non-gallery).
-
Finalize Creation: Click Create. You’ll be redirected to the application’s overview page.
-
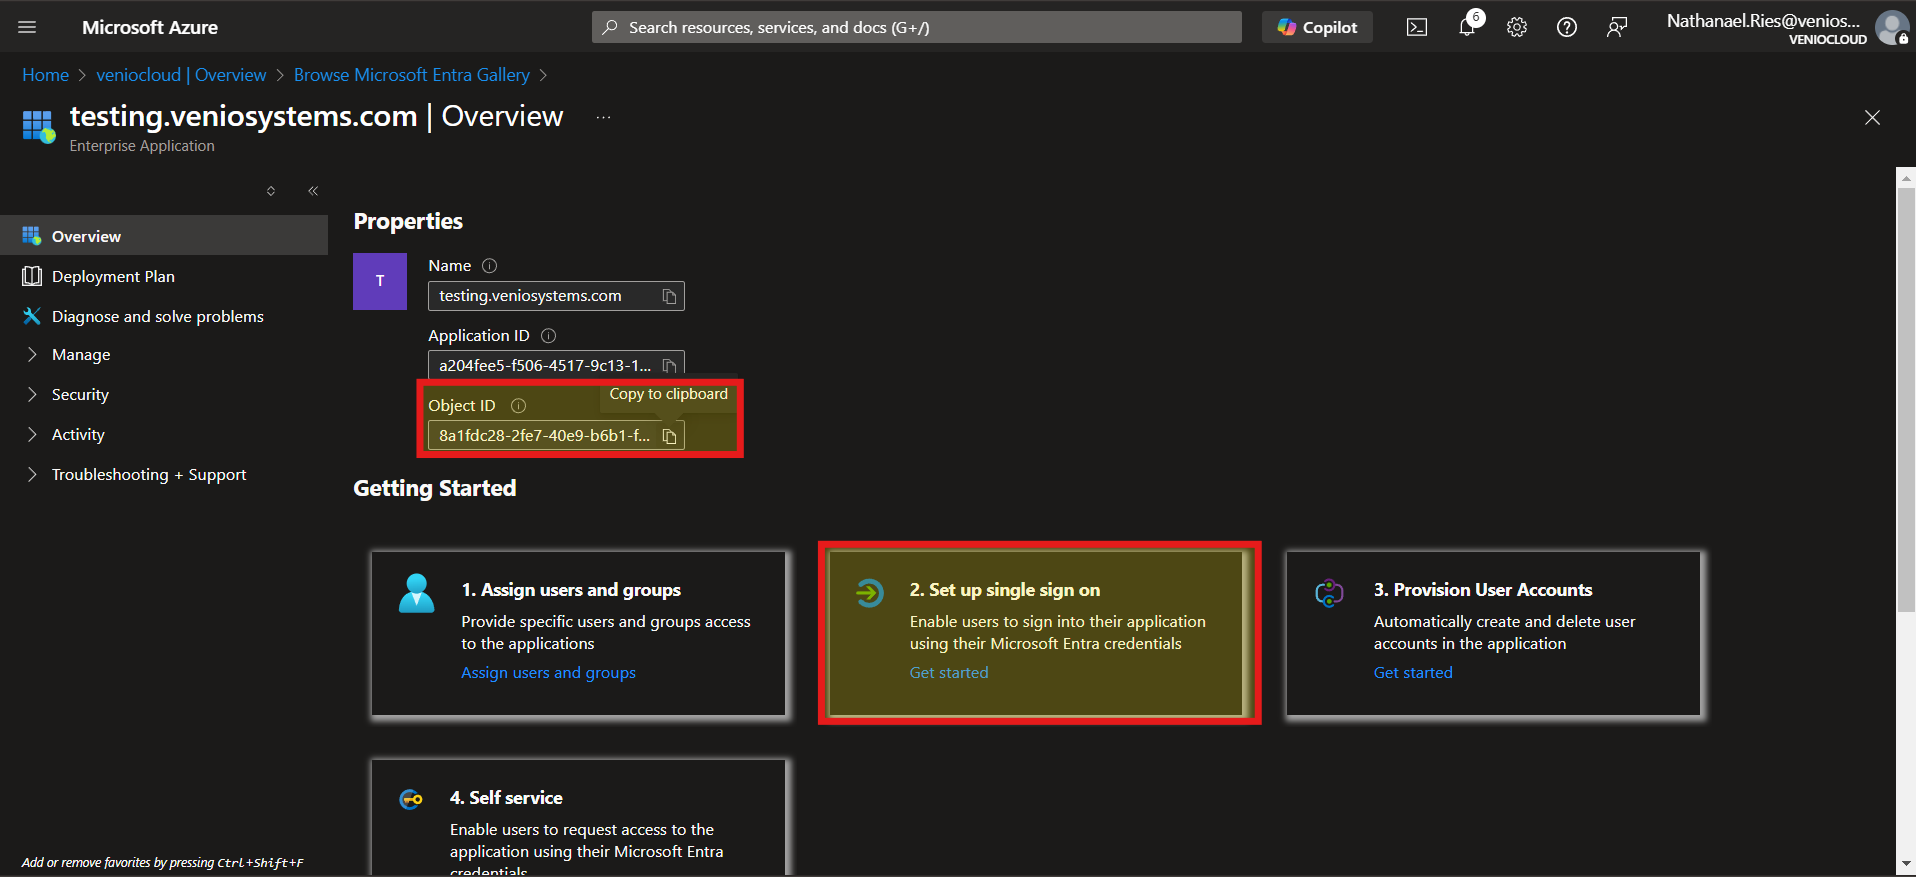
Copy Object ID: Note the Object ID from the overview page for later use.
-
Set up single sign on: click the button titled: 2. Set up single sign on
-
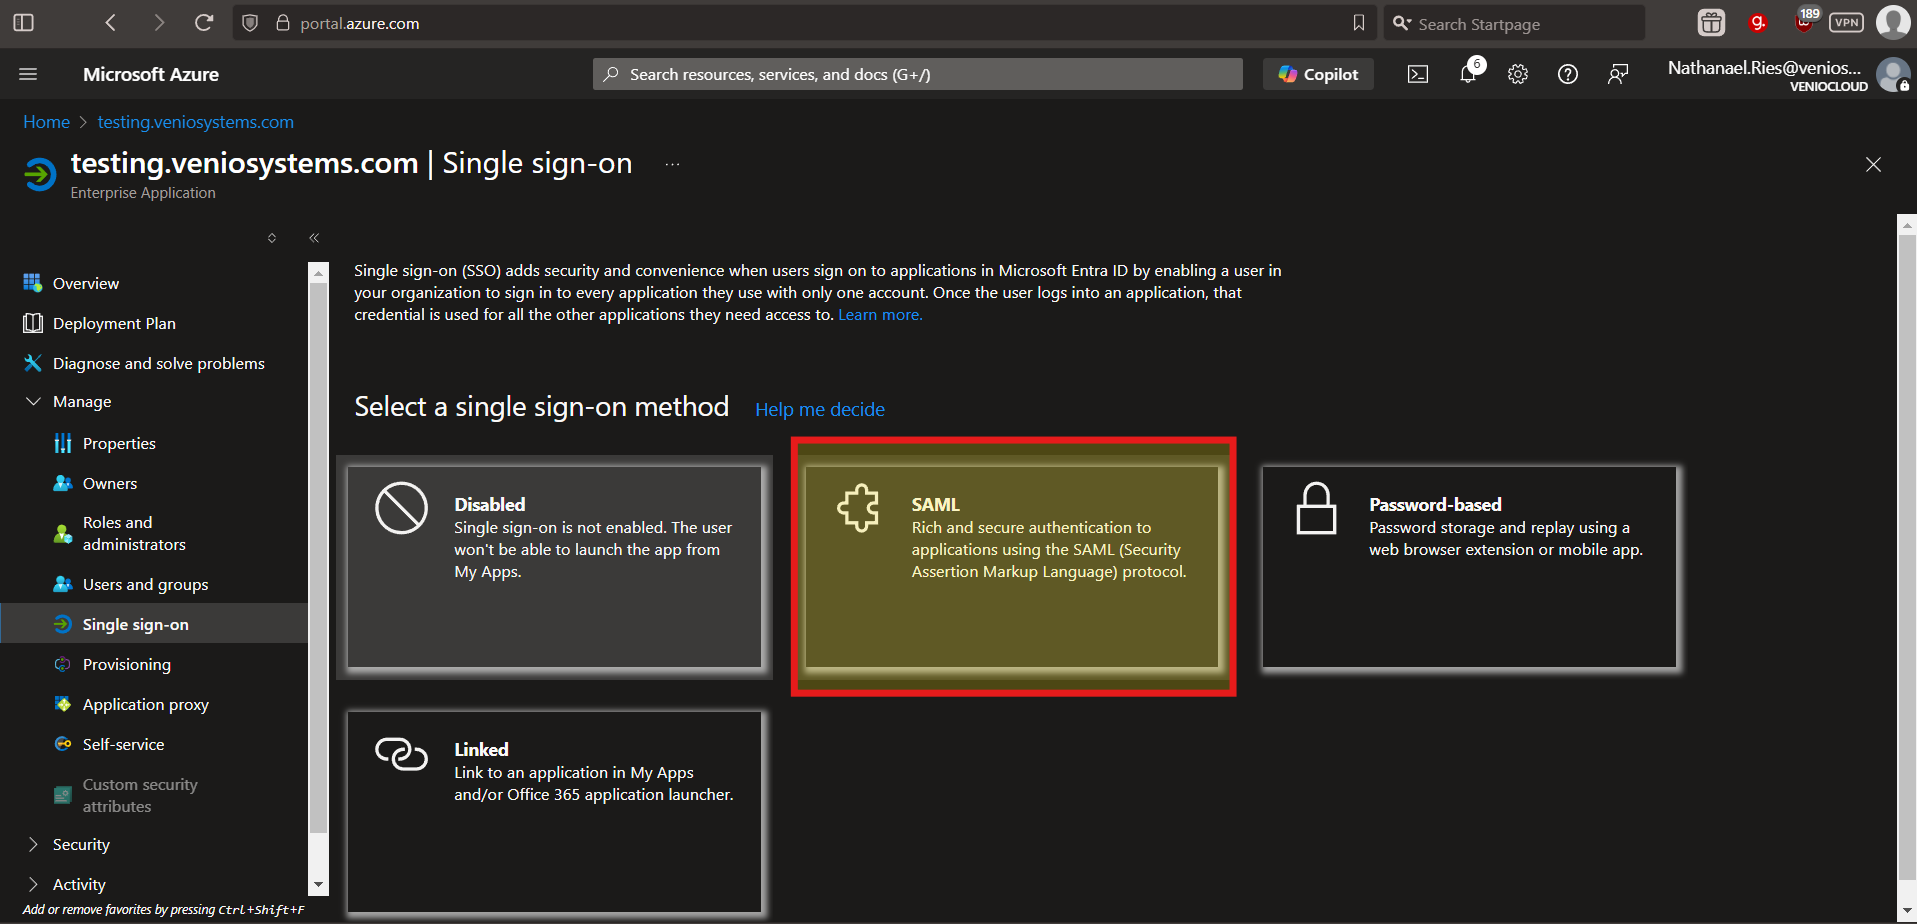
Select a single sign-on method: From the options provided, click SAML.
-
Configure Basic SAML Settings:
- Click Edit in the Basic SAML Configuration section.
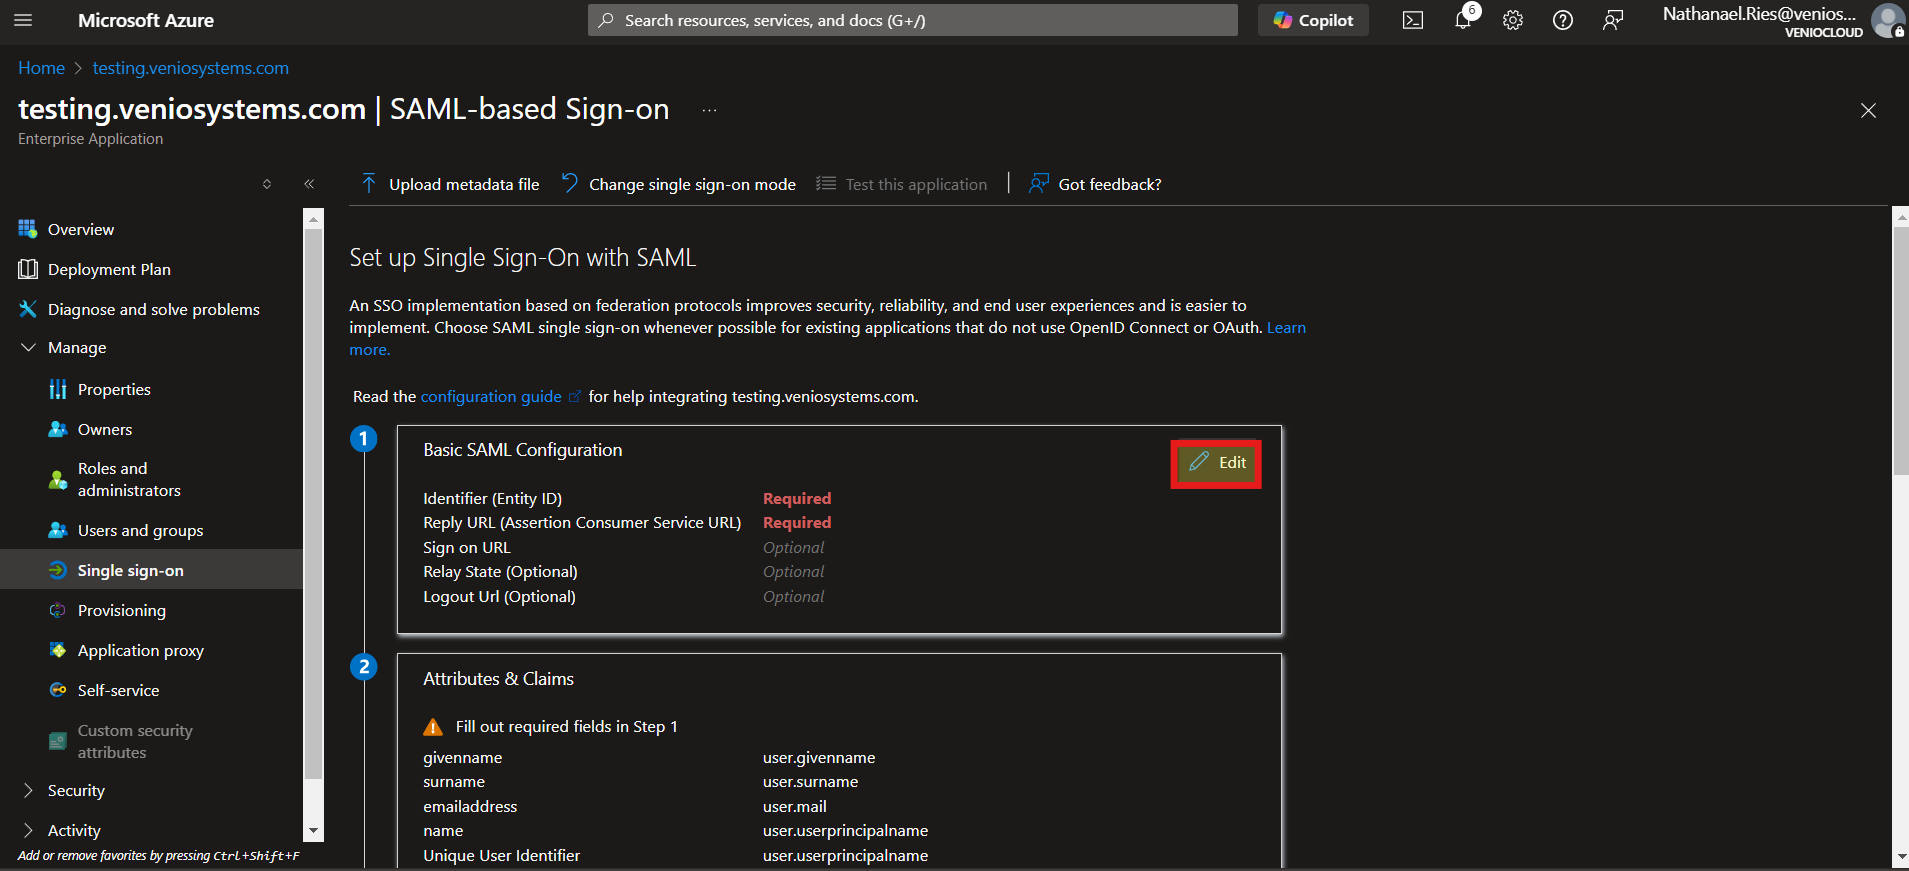
- Set:
- Identifier (Entity ID): Use the <VENIO_WEB_BASE_URL> (e.g.
http://localhost/VenioWeb) - Reply URL: <VENIO_WEB_BASE_URL>/IdpValidation.aspx (e.g.,
http://localhost/VenioWeb/IDPValidation.aspx).
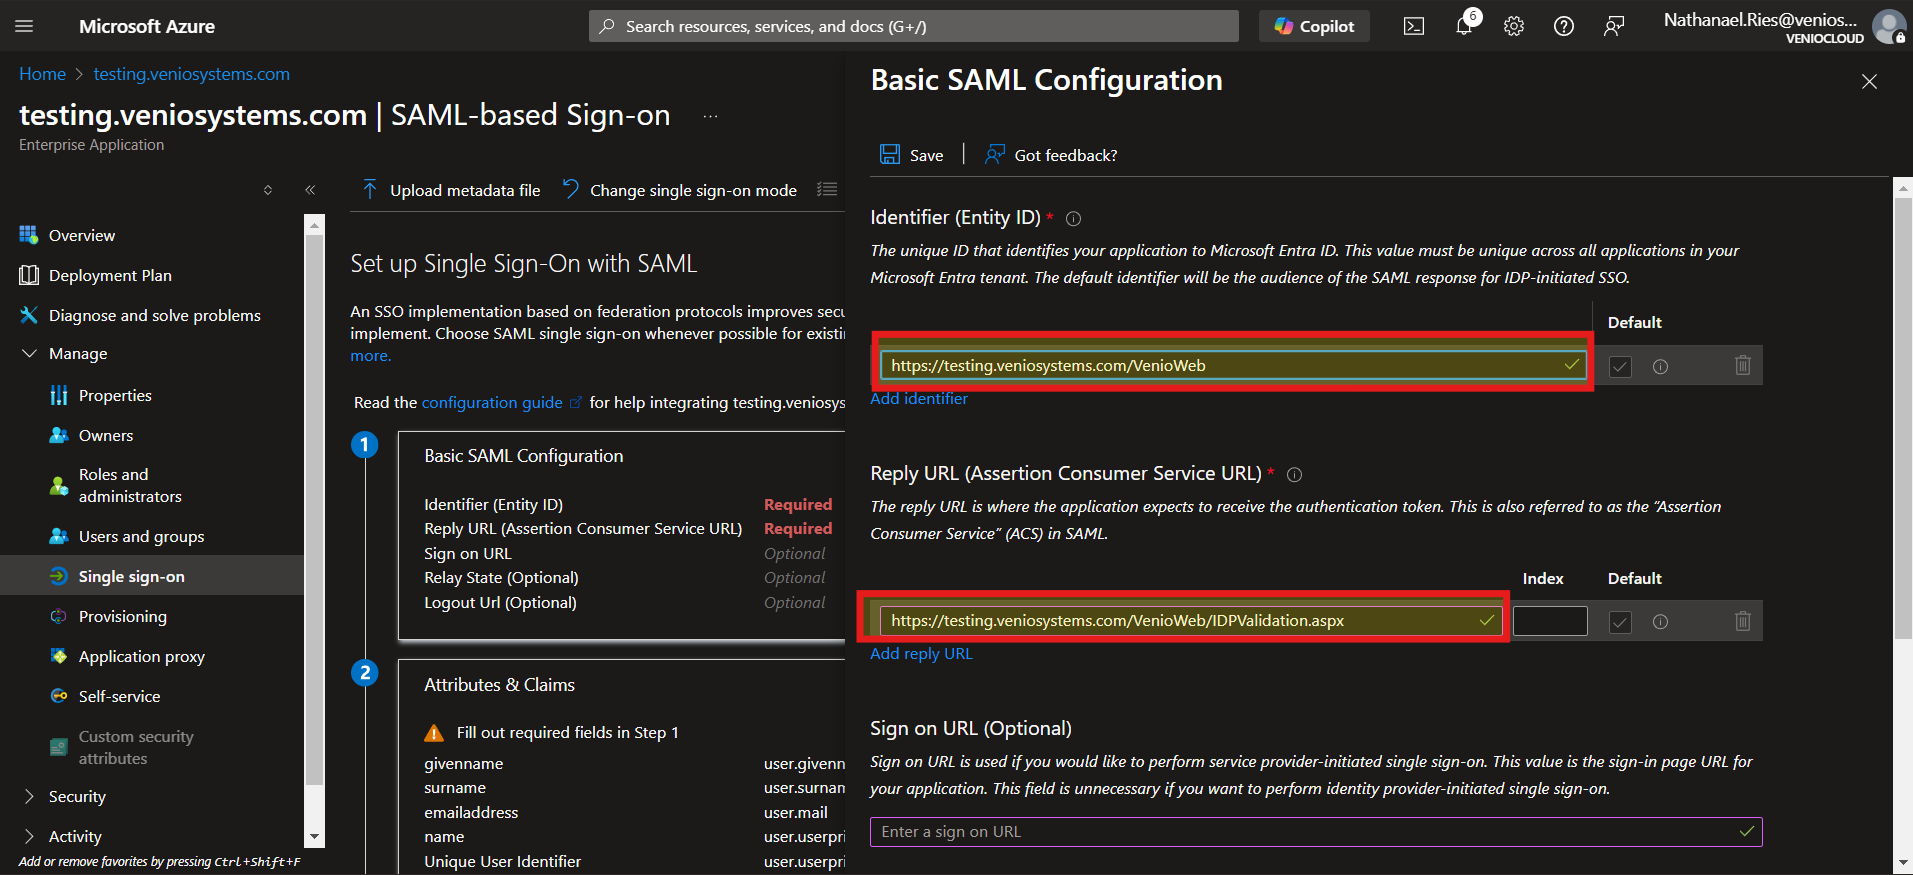
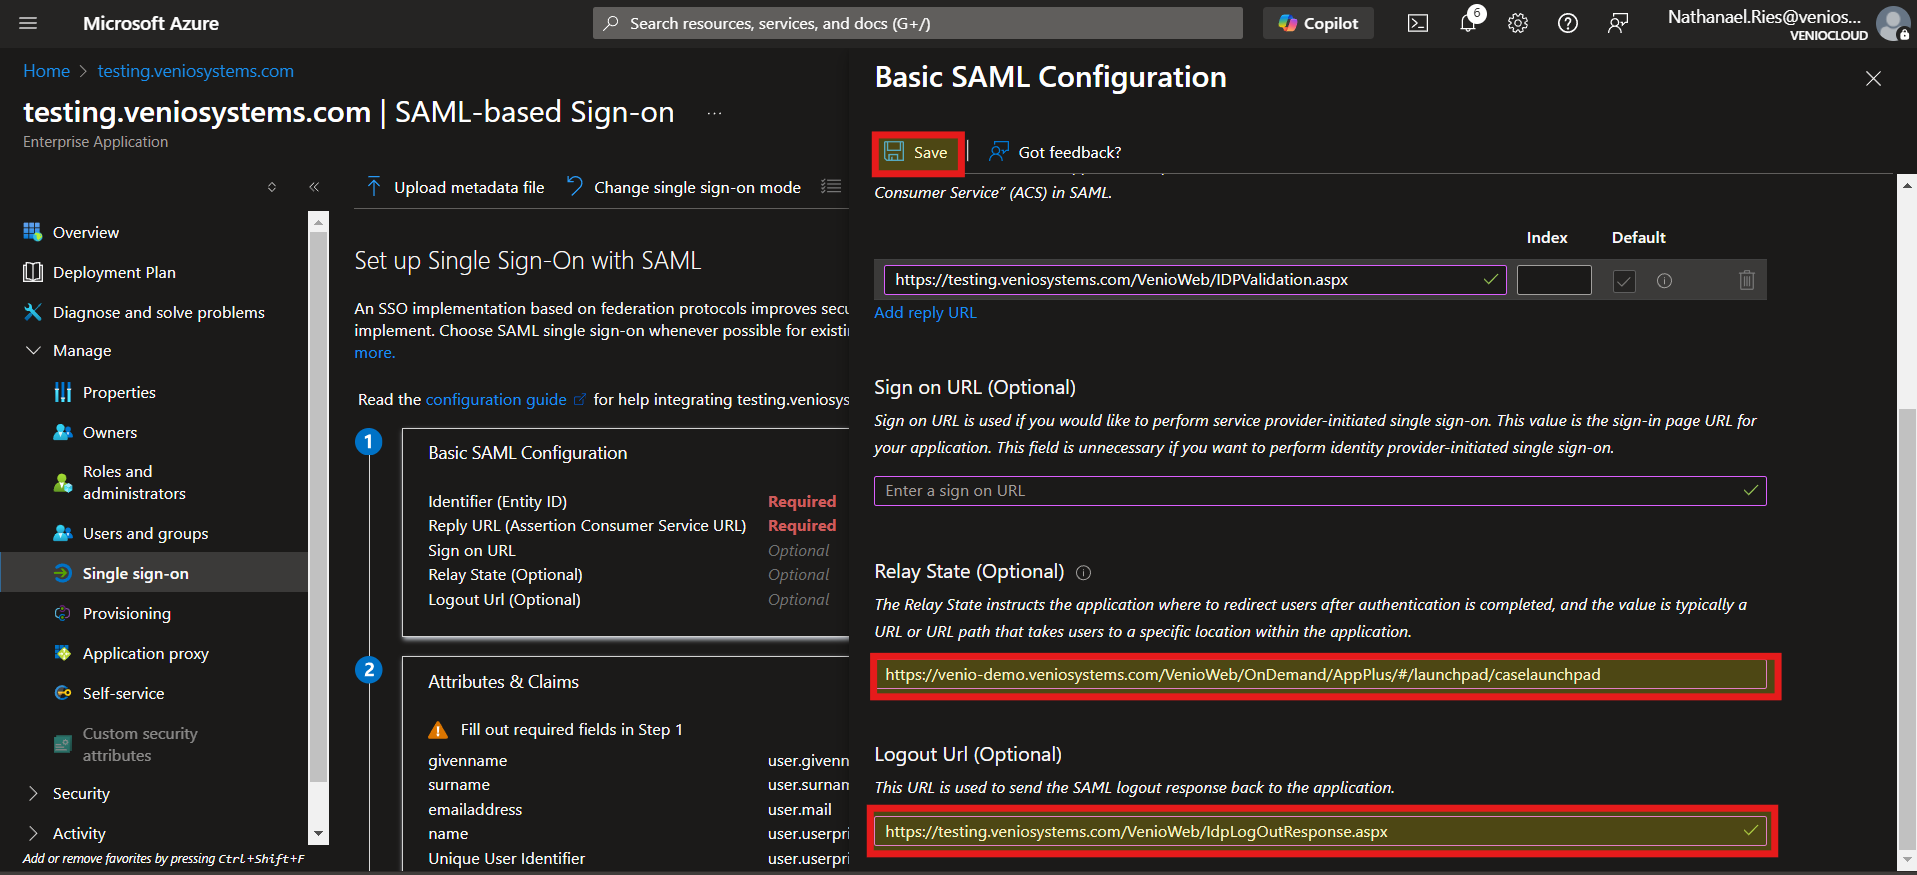
- Relay State: <VENIO_WEB_BASE_URL>/OnDemand/AppPlus/#/launchpad/caselaunchpad (e.g.,
http://localhost/VenioWeb/OnDemand/AppPlus/#/launchpad/caselaunchpad) - Logout URL: <VENIO_WEB_BASE_URL>/idplogoutresponse.aspx .
- Identifier (Entity ID): Use the <VENIO_WEB_BASE_URL> (e.g.
- Click Save.
- Click Edit in the Basic SAML Configuration section.
-
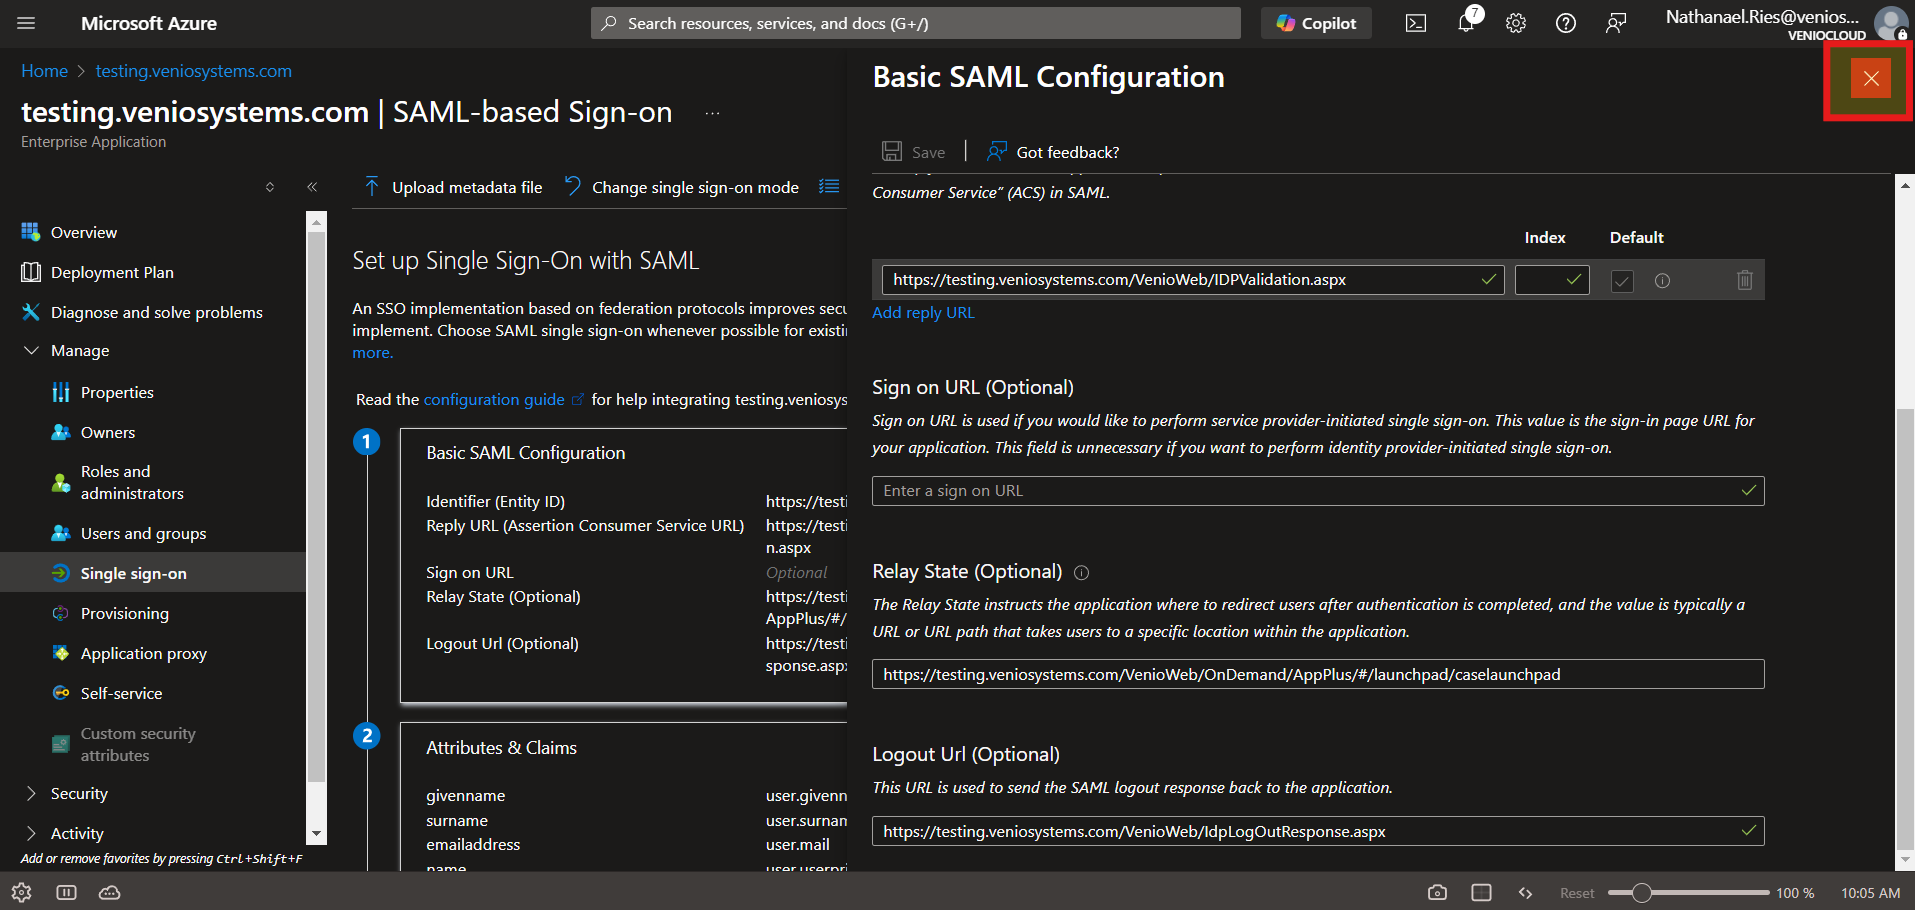
Close the Basic SAML Configuration window
¶ 2.2 Assign Users and Groups to the Application
- Access the Application: Go to your enterprise application in Enterprise applications.
- Assign Users/Groups: Click Assign users and groups > Add user/group.
- Select Users/Groups: Search for and select the desired users or groups, then click Select > Assign.
¶ 3. Configure Venio
This section covers configuring Venio Systems to use Azure Entra ID as the IdP for SSO.
¶ 3.1 Configure IdP Settings in VenioSetup.ini
The VenioSetup.ini file must be updated with the correct IdP settings, including the RSA-formatted private key required to decrypt SAML responses.
Steps:
- Locate the File:
- Find
VenioSetup.iniin the IIS-hosted directory (e.g.,C:\inetpub\wwwroot\VenioWeb\VenioSetup.ini).
- Find
- Edit the File:
- Open
VenioSetup.iniin a text editor. - Add or update the
[IDP SETTINGS]section with the following:- SP_Issuer: Set to the Venio web home URL (e.g.,
http://localhost/VenioWeb). - IdP_PrivateKey: Set to the RSA-formatted private key in PEM format (see Annex A for instructions on generating this key).
- Example:
[IDP SETTINGS]
SP_Issuer=http://hostmachineName/VOD
IdP_PrivateKey=<key_content>
- SP_Issuer: Set to the Venio web home URL (e.g.,
- Ensure the
IdP_PrivateKeyis on a single line, with no extra spaces or line breaks, and includes only the content between-----BEGIN RSA PRIVATE KEY-----and-----END RSA PRIVATE KEY-----.
- Open
- Save the File:
- Save and close
VenioSetup.ini. - Restart IIS by running
iisresetin the command prompt to apply changes.
- Save and close
Note:
- The private key must be in RSA format to decrypt SAML responses from Azure Entra ID. Incorrect formatting or mismatched keys will result in authentication errors (e.g.,
<Error><Message>An error has occurred.</Message></Error>).
¶ 3.2 Enable IdP
- Access Settings: Go to Administration > Login Settings > SAML-IdP Server Settings.
- Select Provider: Choose
AZURE_ADas the provider. - Upload Metadata: Use the Federation Metadata XML file downloaded from Azure Entra ID.
- Save: Click Apply.
- Group Mapping: Check the four group mapping checkboxes (if unchecked, manual user import is required).
¶ 3.3 Import Users (If Group Mapping Is Not Fully Utilized)
¶ Prerequisites
- Users must be created and assigned to the enterprise application in Azure Entra ID.
¶ Steps
- Open Console: Log in to the Venio console application.
- Navigate: Go to Administration > Users.
- Initiate Import: Click Next > Add Users from IdP > Next.
- Provide Credentials:
- Tenant ID and Client ID: From app registration.
- Secret Value: From app registration.
- Application Object ID: From enterprise application creation.
- Load Users: Click Load users from IdP, then OK when complete.
- Select Users: Choose users to import and click Next.
- Assign Roles: Specify admin level, application access, client name, and projects, then click Finish.
¶ 3.4 IdP Group Mapping (Alternative to Manual Import)
¶ Prerequisites
- Create and assign Venio-related groups in Azure Entra ID (e.g.,
Venio Admin,Project Admin,Reviewer, etc.). - Assign users to these groups based on their roles.
¶ Steps
- Access Settings: Go to Administration > Login Settings > SAML-IdP Server Settings.
- Provide Credentials (if not displayed):
- Tenant ID, Client ID, Secret Value, Application Object ID.
- Load Groups: Click Load groups to populate the combo box with assigned groups.
- Map Groups: Check the relevant checkboxes and map Azure Entra ID groups to Venio roles.
- Save: Click Apply.
¶ 4. SSO Setup for The VenioConnector™ for Direct Exports to Relativity Server (SAML)
This section details how to integrate Venio with Relativity Server using SAML.
¶ 4.1 Prerequisites
- Administrative access to Venio Systems.
- A Relativity Server instance with SAML SSO configured.
- Relativity Server’s IdP metadata URL and security certificate.
¶ 4.2 Step-by-Step Instructions
- Configure Venio as a Service Provider (SP):
- Log in to Venio as an administrator.
- Navigate to Admin Settings > Connectors > Create > Environment.
- Select Relativity as the connector type.
- Enter an Environment Name (e.g., "Relativity Server").
- Input the IdP Metadata URL and upload the security certificate from Relativity Server.
- Click Create.
- Enable SSO on the Frontend: Verify the "Login with Relativity" button appears on the Venio login page.
- Handle Authentication Redirect: Post-authentication, Relativity Server sends a SAML assertion to Venio’s callback URL, establishing a session.
- Map Users: Match users via email/username from the SAML assertion; create new records if necessary.
- Test the Setup: Log out, click "Login with Relativity", authenticate, and confirm access to Venio.
¶ 5. SSO Setup for The VenioConnector™ for Direct Exports to RelativityOne (OAuth with OIDC)
This section covers integrating Venio with RelativityOne using OAuth with OIDC.
¶ 5.1 Prerequisites
- Administrative access to Venio Systems.
- A RelativityOne instance with OAuth/OIDC configured.
- Client ID and Client Secret from RelativityOne.
- Base API URL (e.g.,
https://my.relativity.one).
¶ 5.2 Step-by-Step Instructions
- Enable the Relativity Connector in SQL:
- Access the VenioPCD database in SQL Server.
- Update
tbl_pj_ControlSettingwhereKey = "ENABLE_CONNECTOR"toValue = 1. - Run
iisresetin the command prompt to restart IIS.
- Configure Venio for RelativityOne:
- Go to Admin Settings > Connectors > Create > Environment.
- Select RelativityOne as the connector type.
- Enter an Environment Name, Client ID, Client Secret, Base API URL, and Client Name.
- Click Create.
- Enable SSO on the Frontend: Ensure the "Login with Relativity" button is visible.
- Handle Authentication Redirect: RelativityOne sends an OIDC token to Venio’s callback URL for session creation.
- Map Users: Match users via email/username from the OIDC token; create new records if needed.
- Test the Setup: Log out, click "Login with Relativity", authenticate, and verify access.
¶ 6. Troubleshooting and FAQs
¶ 6.1 Common Errors and Solutions
- "SingleSignOnError":
- Cause: Token validation or configuration issues.
- Solution: Verify IdP metadata/certificate (SAML) or Client ID/Secret (OIDC), callback URL, and system clock sync.
- "User not found":
- Cause: No matching user in Venio’s database.
- Solution: Ensure email/username alignment or create a new user.
- "Token expired":
- Cause: Token validity ended.
- Solution: Enable token refresh (OAuth/OIDC) or adjust session timeouts (SAML).
- Generic XML Error (
<Error><Message>An error has occurred.</Message></Error>):- Cause: Often related to incorrect private key format or mismatched keys.
- Solution: Ensure the private key in
VenioSetup.iniis in RSA format and matches the public certificate in Azure Entra ID. Check the database logs for detailed errors.
¶ 6.2 Frequently Asked Questions (FAQs)
- Why use Client ID and Client Secret for RelativityOne?
- OAuth/OIDC uses these for secure, programmatic authentication, unlike SAML’s username/password approach.
- SAML vs. OAuth/OIDC?
- SAML is for enterprise authentication; OAuth/OIDC combines authorization and authentication for cloud services.
- Handling token expiration?
- OAuth/OIDC refreshes tokens automatically; SAML revalidates based on session settings.
- Multiple Relativity instances?
- Configure separate environments in Venio for each instance.
- SSO fails after setup?
- Check configurations, authentication methods, and error logs.
¶ 7. Annex A: Preparing Public and Private Keys
This section provides detailed instructions for generating and preparing the public and private keys required for SSO with Azure Entra ID. The private key must be in RSA format for compatibility with Venio’s SAML decryption process.
¶ 7.1 Create a Self-Signed Certificate in IIS
- Open IIS Manager:
- Launch IIS Manager on the server where Venio is hosted.
- Select the server node in the left-hand pane.
- Access Server Certificates:
- In the main pane, double-click Server Certificates.
- Generate Certificate:
- Click Create Self-Signed Certificate in the Actions pane.
- Enter a name for the certificate (e.g.,
VenioSSOCert). - Select Personal as the certificate store.
- Click OK to create the certificate.
¶ 7.2 Export Certificates
- Locate the Certificate:
- In IIS Manager, under Server Certificates, double-click the newly created certificate to open its details.
- Export Public Certificate (for Azure Entra ID):
- Go to the Details tab and click Copy to File.
- In the Certificate Export Wizard:
- Select No, do not export the private key.
- Choose DER encoded binary X.509 (.CER) as the format.
- Specify a file name (e.g.,
PublicKey.cer) and save the file.
- Export Private Certificate (for Venio):
- Repeat the Copy to File process for the same certificate.
- In the Certificate Export Wizard:
- Select Yes, export the private key.
- Choose Personal Information Exchange - PKCS #12 (.PFX) format.
- Enable Include all certificates in the certification path if possible.
- Set a password for the PFX file (e.g.,
password). - Specify a file name (e.g.,
Full_Token_Cert.pfx) and save the file.
¶ 7.3 Convert Private Key to RSA Format
The private key must be extracted from the PFX file and converted to RSA format for use in VenioSetup.ini.
Prerequisites:
- Install OpenSSL (available from slproweb.com).
- Ensure OpenSSL is accessible from the command line (e.g., add
C:\Program Files\OpenSSL-Win64\binto your system PATH or navigate to that directory).
Steps:
- Extract the Private Key:
- Open a command prompt or PowerShell and navigate to the directory containing the PFX file.
- Run the following command to extract the private key:
openssl pkcs12 -in Full_Token_Cert.pfx -out PrivateKey.key -nodes - Enter the PFX password when prompted (e.g.,
password). - This generates
PrivateKey.keyin PEM format.
- Check and Convert to RSA Format:
- Open
PrivateKey.keyin a text editor. - If the key starts with
-----BEGIN PRIVATE KEY-----, it is not in RSA format and must be converted. - Run the following command to convert the key to RSA format:
openssl rsa -in PrivateKey.key -out RSA_PrivateKey.key -traditional - This generates
RSA_PrivateKey.key, which starts with-----BEGIN RSA PRIVATE KEY-----. - If the key already starts with
-----BEGIN RSA PRIVATE KEY-----, no conversion is needed, and you can usePrivateKey.keydirectly.
- Open
- Copy the RSA Private Key:
- Open
RSA_PrivateKey.key(orPrivateKey.keyif already in RSA format) in a text editor. - Copy the key, between
-----BEGIN RSA PRIVATE KEY-----and-----END RSA PRIVATE KEY-----. - Paste this key into the
IdP_PrivateKeyfield inVenioSetup.ini(see Section 3.1), ensuring it is formatted as a single line with no extra spaces or line breaks.
- Open
Note:
- The private key in RSA format is required for Venio to decrypt the SAML response from Azure Entra ID. Using a key in the wrong format will cause decryption failures and authentication errors.
¶ 7.4 Upload Public Certificate to Azure Entra ID
- Access Token Encryption Settings:
- In the Azure Portal, navigate to Enterprise Applications > Select your application > Token encryption.
- Upload Public Certificate:
- Click Import certificate and upload the
PublicKey.cerfile generated in Section 7.2. - Activate the token encryption certificate by selecting it and clicking Activate.
- Click Import certificate and upload the
- Verify Pairing:
- Ensure the public certificate uploaded to Azure Entra ID corresponds to the private key used in
VenioSetup.ini. Mismatched keys will cause authentication failures.
- Ensure the public certificate uploaded to Azure Entra ID corresponds to the private key used in
¶ 7.5 Validation
- Purpose of Certificates:
- The public certificate is used by Azure Entra ID to encrypt the SAML response.
- The private key (RSA format) is used by Venio to decrypt the SAML response.
- Common Issues:
- Incorrect Private Key Format: Ensure the private key is in RSA format (starts with
-----BEGIN RSA PRIVATE KEY-----). Non-RSA keys will cause decryption errors. - Mismatched Keys: Verify that the public and private keys are from the same certificate pair.
- Expired Certificates: Check the certificate’s validity period in IIS Manager or Azure Portal.
- Incorrect Private Key Format: Ensure the private key is in RSA format (starts with
- Testing:
- After configuring the keys, test the SSO login. If an error occurs (e.g.,
<Error><Message>An error has occurred.</Message></Error>), check thetbl_ex_exceptionloginfotable in theVenioPCDdatabase for detailed error messages:SELECT * FROM tbl_ex_exceptionloginfo
- After configuring the keys, test the SSO login. If an error occurs (e.g.,
¶ 8. Additional Resources
- RelativityOne OAuth Documentation: RelativityOne Authentication
- Relativity Server SAML Documentation: Relativity Server SSO
- Venio Support: Contact support@veniosystems.com for assistance.